Assistance and support

An overview of the most important functions:

FAQ

User interface

You can change the product at any time in the menu on the left-hand side. You can add text, insert elements such as icons or shapes and upload, place and arrange your own images and logos.

The options for the currently selected element are displayed on the right-hand side.

Above the configuration, you will find an undo button for the last action and a traffic light for notes and warnings. In the top right-hand area, you can save your work, open an existing configuration or go directly to the shopping cart.

If you intentionally or unintentionally place an element in a non-printable area, this will be indicated by the green shaded area.

Below the configuration, you will see notes and warnings, if available. Here you can also generate a preview of your configuration in various environments for a more detailed check or finalize the configuration for ordering.

Context menus / pop-up menu

The context menu on the currently selected element provides you with a number of helpful functions. You can

  1. lock them so that they are not moved accidentally
  2. duplicate
  3. delete
  4. arrange to align the object horizontally and vertically on the box and move it to the foreground or background.
Add text

To add text, click on “Configure text” on the left and then on “Add text field” on the right.

The text is automatically placed on the lid. You can then move the text or color it using the menu on the right, add effects, adjust the font and size or add more text fields.

You can edit the text either via the text box or directly in the box on the lid.

Images and logos

To upload images or logos, simply click on “Images and upload” and then on “Upload images” on the right. In the following dialog, you will see your previously uploaded images on the left-hand side. If you want to save them for longer for reuse, you should log in to meinSpelsberg first. Otherwise, your uploaded images will only be available temporarily.

After confirming the message, you can drag and drop the image onto the field or select it from the Explorer via “Select image”. If you click on “Upload image to website”, the window closes and the image appears in the selection on the right. Click again to place it on the cover. The placed image can then be resized, enlarged, rotated, moved and given effects. For pixel formats such as JPG or PNG, it is also possible to crop and adjust the shape using a mask.

Elements, icons, shapes

The elements work very similarly to images and logos, but we have already prepared a selection of elements for you. You'll find lots of icons and a range of shapes.

You can place these by clicking or dragging and dropping. For vector graphics that you have inserted via “Upload images”, you can adjust the color here and add further effects.

Your last used colors are also saved.

Copying elements between configurations

You can copy and paste elements with Ctrl + C (Command + C on the Mac) and Ctrl + V. This even works between two simultaneously opened tabs with different configurations or if you want to change a product again.

Messages and quality indicator

During configuration, you should keep an eye on the messages and quality traffic lights. Check whether the traffic light is green or whether you have deliberately created the warnings in yellow. You should correct red warnings, otherwise the print result will not be optimal.

Click on the traffic light above for details of the warning messages. If there are several warnings, a message can be selected and activated in the configuration so that you can see which element it is.

It is also best to take another look at the preview to make sure that the print meets your expectations.

Save design

You can click above to save your design. If you are not logged in, you will be prompted to log in. This function is only available to meinSpelsberg members. As soon as you are logged in, assign a name and click on Save configuration.

Open configuration

To continue editing a saved design, click on “Open configuration” in the configuration window or look in the mySpelsberg area under myPrint orders.

Managing configurations and media

Managing configurations
As a registered mySpelsberg user, you can conveniently manage your configurations under myPrint jobs. Here you can filter for completed and open configurations. The important difference: Completed designs can no longer be changed or deleted. However, you can copy them in order to edit the design further. Open designs can be customized at any time. You can change the name of the configuration or split the configuration. You can also create new configurations directly here.

Media management
You also have the option to manage your uploaded media - view, delete or add new media.

Share and import configurations

As a meinSpelsberg member, you have the option of sharing your designs with colleagues. To do this, unfold a saved configuration and click on “Share”. You will now be shown a code, which you can now pass on by email, for example. Please note, however, that the configuration can only be imported once. For incomplete configurations, the status at the time of importing is transferred - so change shared configurations with caution.

To import a configuration, click on the “Import configuration” button on the right-hand side of the “My print jobs” page in the MySpelsberg area. In the pop-up, enter the code you received from another person and confirm with “Import”.

Complete configuration

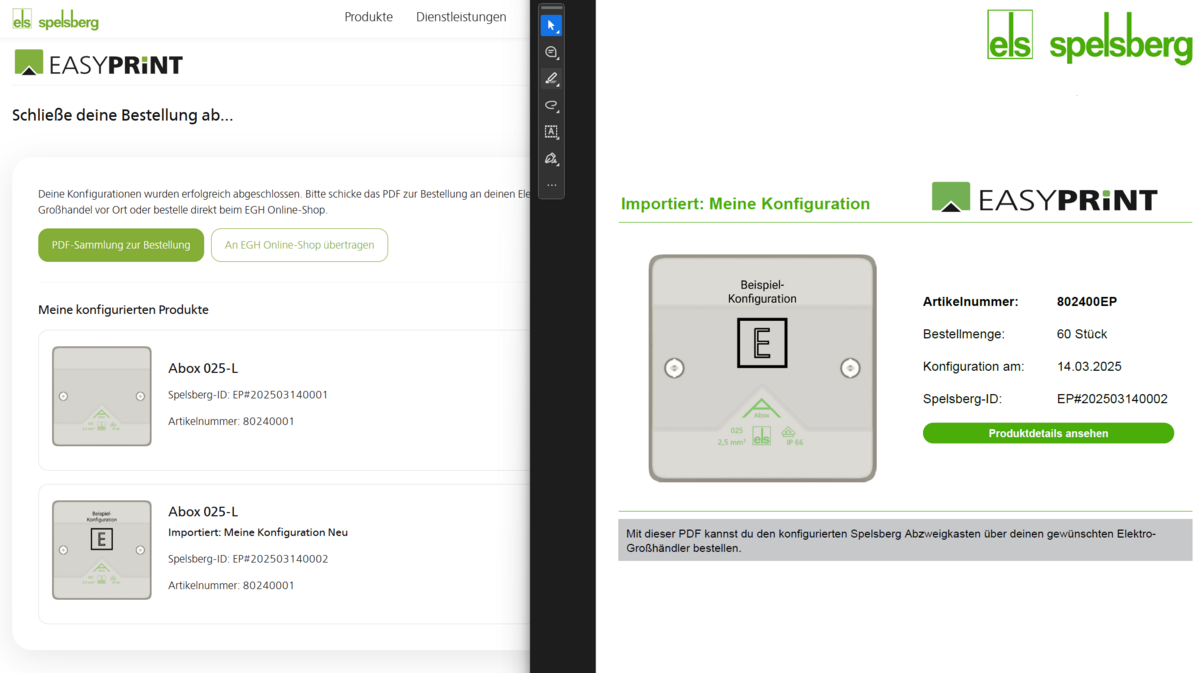
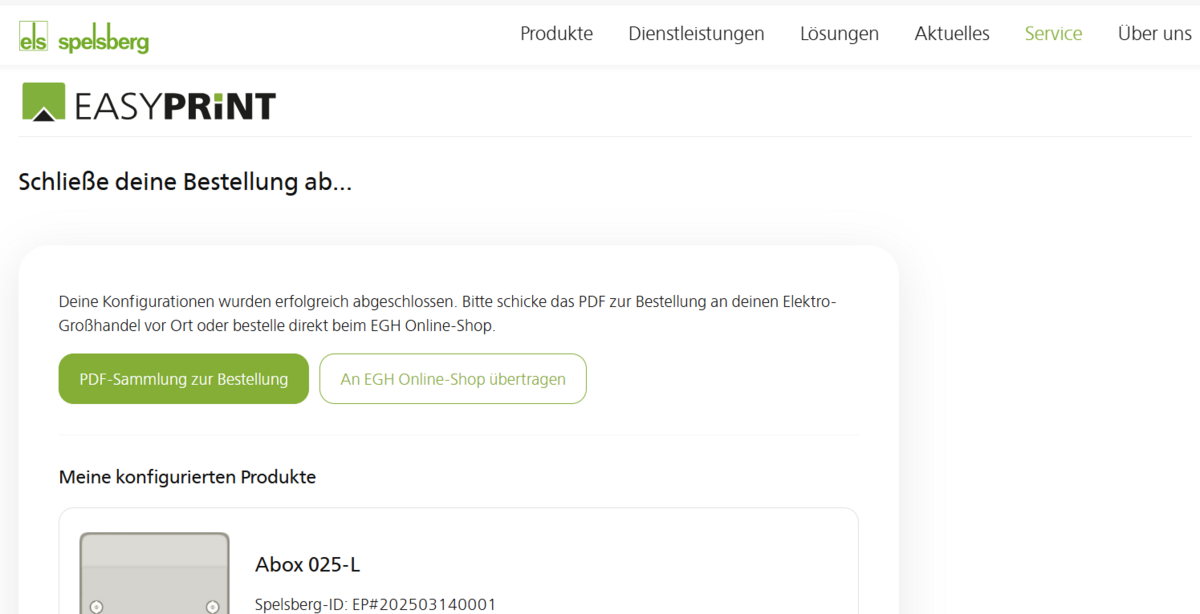
To complete your configuration, click on “Complete configuration” below and then on “Save and add to cart”. You now have the option of adding further configurations to the shopping cart and defining the quantity. You will also see the estimated surcharge per item, for the item and for the entire order.

If everything fits, you confirm the privacy policy and approve the print images. If you then click on “Finalize configuration” again, the configurations are locked and receive their own configuration ID. This can be seen on the next page.

Bestellung über EGH Online Shop / ELBRIDGE

Sobald du deine Konfiguration(en) über den Warenkorb abgeschlossen hast kannst du als meinSpelsberg-Mitglied direkt über den EGH-Onlineshop bestellen. Leider unterstützen nicht alle EGH-Shops die Elbridge Schnittstelle zu 100% - es kann also sein, dass du nach deiner Bestellung eine Rückfrage zu der bestellten Konfigurations-ID bekommst. Wir empfehlen deshalb zusätzlich die Bestell-PDF herunterzuladen und für Rückfragen zu speichern.

Order via order PDF

After completing your order in the shopping cart, you can download one or more order PDFs. These PDFs contain all the information you need to order your configured junction box from your local wholesaler, by email or by phone. You can also use the information from the PDF for repeat orders at a later date; it is not necessary to complete another order in EasyPrint.


Do you have further questions
or need support?

Would you like personal advice?

Our experts will be happy to help and are available during business hours.

Business hours from 8:00 - 17:00 (Fridays until 14:00)

+49 2355 892-155
Add product to Watchlists

Existing Watchlists

New Watchlist

organize Watchlist